Home | Gallery | Links | Index | Contact

Thursday, September 27, 2007

Rubbing Elbows at Maroon Bells


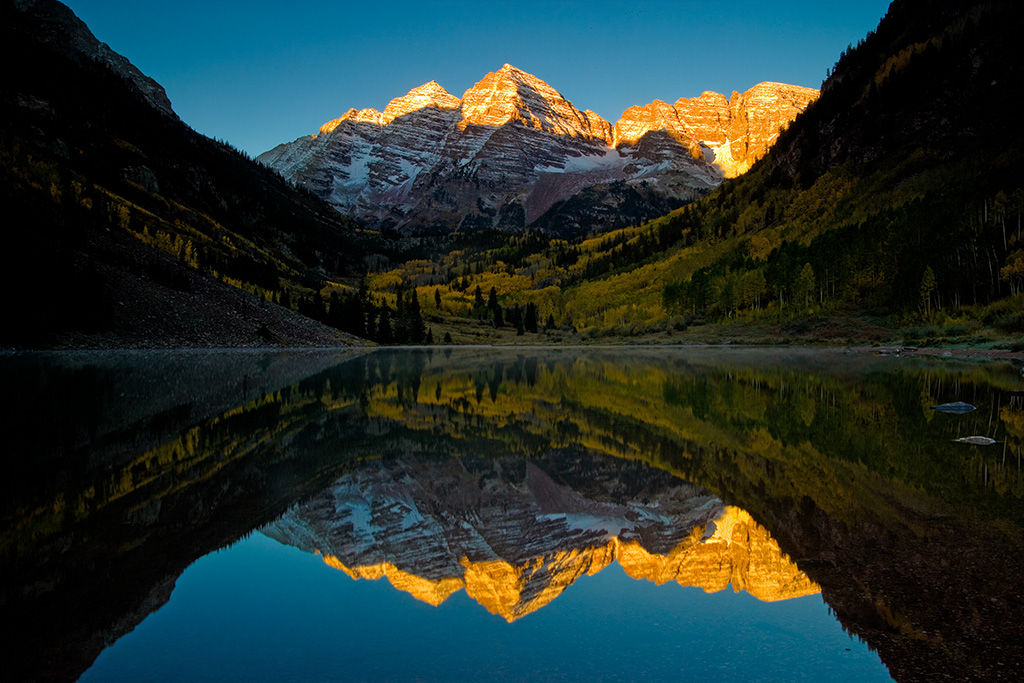
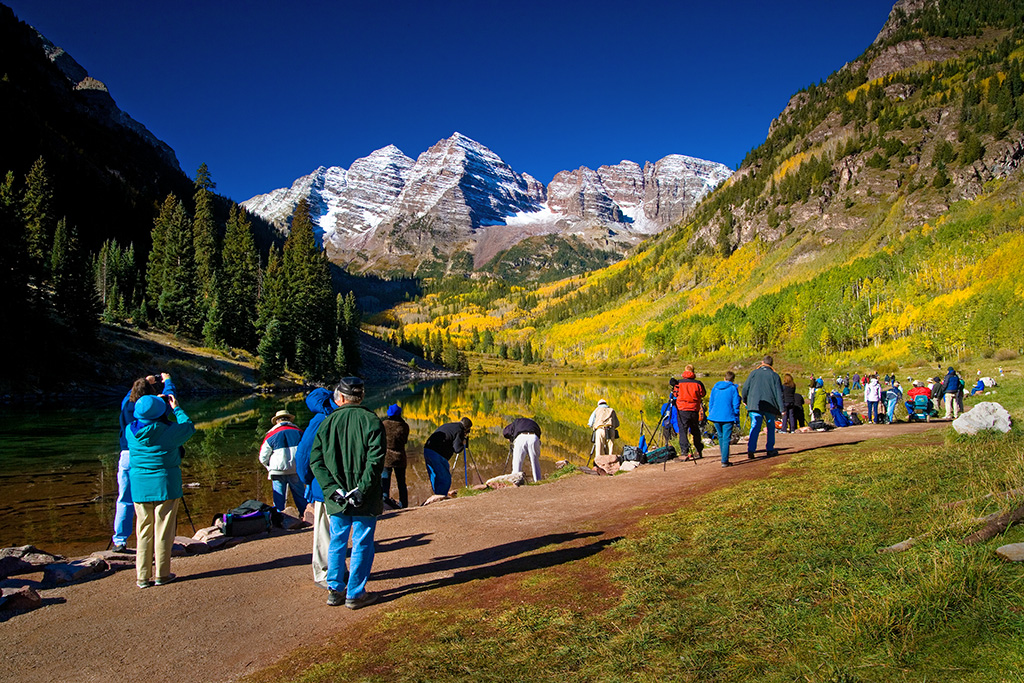
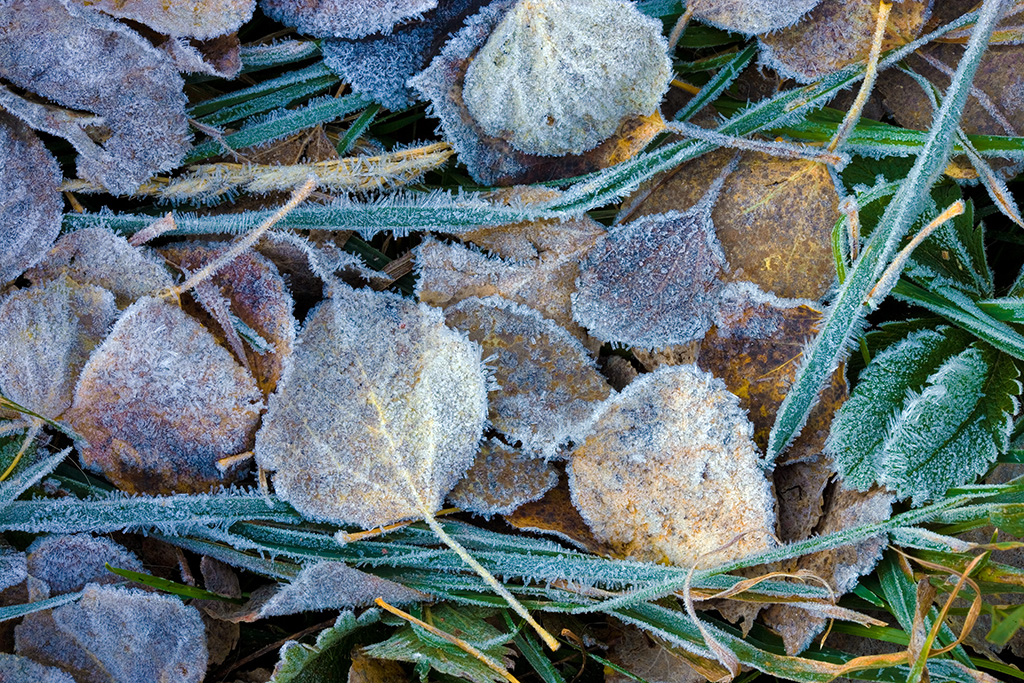
On the last Monday of September I drove straight from Los Angeles to Maroon Bells, CO. It took 15 hours and I was beat. I slept in the back of my SUV. I didn't want to miss sunrise. When I awoke it was dark and their was frost on the ground. It was an hour before sunrise as I walked down to the lake. Wow! At least 60 photographers were elbow to elbow. I grabbed a spot and watched as the conga line grow. Someone later counted 107 photographers.


I used a split neutral density filter for the first sunrise shot. It took on a nice red glow and the water remained calm for a perfect reflection. I used f22 and my focus point was about a third of the way into the picture to give me the greatest depth of field.


It was freezing cold so I took a hike to warm up. I stopped to take up near the creek and ran into Derek von Briesen. I met Derek while shooting Red Rock Crossing in Sedona. Derek gives workshops and I hope to join him on one soon. He's very gifted and has a talent for teaching too. You can check out some of his fine works at his gallery. It was great seeing him again.


It took an hour before the sun came up over the surrounding ridge and let the light poor onto the aspens. I think it was close to 10 or 11 when the pine trees on the left lit up. No filtration was needed as the light in the scene was now balanced. I tried a polarizer but the sky is already a dark blue.


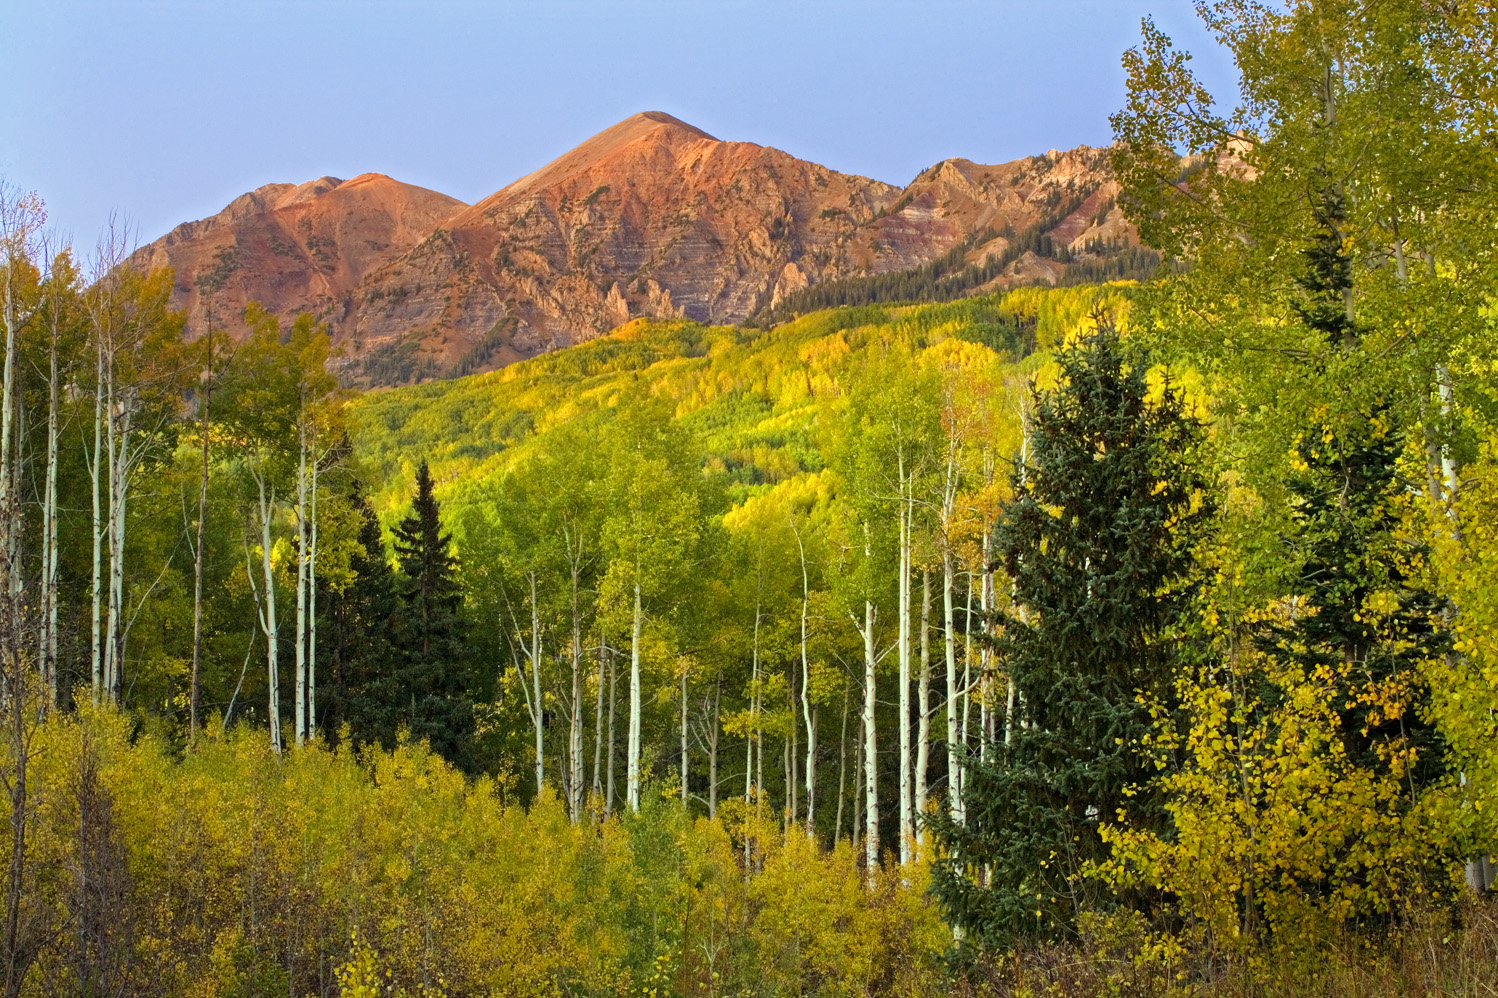
I headed back down the road and spotted some aspens that I wanted to shot but it was too late. I returned the next day a little earlier and the light was just over the top of the cliff. The backlight really made the trees pop out. The stand of trees was perfect as a panoramic. I stitched them together with ArcSoft's Panorama Maker 4. For the how to's see my previous article here.


I got off to late start in the afternoon as I headed for Kebler Pass. It's about 2 hours to the crest from where I'm staying in Carbondale. Kebler Pass is a 26 mile long dirt road. When I passed over the top towards the Crested Butte side there was plenty of color but not much light. I spotted the perfect scene. It was a 30 second exposure @ f22, ISO 100. The wind blurred the leaves and gave it a painterly look. I returned the next day about an hour before sunset, but the light was never the same. I have many sharp pictures but none equal to this one.

I tried to post this while I was on the road but my server (iPower) locked up and I didn't want to spend an hour on the phone with them.

For more photos see Latest Additions on my gallery. These are straight off my laptop and need to be tweaked a little. I'll have additional photos, articles and color corrected images later this week.

Labels: , , ,

Friday, September 21, 2007

Links

Photo Tips Article Index

Scenic Locations

Photographing Mt.Whitney & the Alabama Hills
Yosemite Stock Photo Gallery
Photographing California's Wildflowers
Earthday and Photography
Photographing Yosemite in Winter
Photographing Dead Horse Point
Photographing Bryce
Pixel Wrangler (Balanced Rock, Arches, UT)
Photographing Mesa Arch
Rubbing Elbows at Maroon Bells
Photographing Mt. Rainier National Park
Photographing The California Redwoods
Photographing The Columbia River Gorge
Photographing Malibu
Photographing Hunting Island, SC
The Last Days of Summer (Leo Carrillio State Beach, CA)
Photographing Big Sur

Photoshop Tips

A Recipe for Fine Art
Black and White Conversions
A Stitch in Time

Flash Tips

Shooting Ducks
Flowers for Mom
What! Using Flash For Nature Photography!
What a Wild Ride

Reviews

Nik Silver Effects Pro
Hummingbird Flies
Tamron 200-500mm Lens Review

More Tips

Perenaial Favorites (Photographing Flowers)
Back to the Scene of the Crime
Rock 'n' Roll is Here to Stay

Updates will follow as needed.

Labels:

Tuesday, September 18, 2007

Photographing the California Redwoods

California RedwoodsAs I headed back from Mt. Rainier to Los Angeles I took a chance and went to the California Redwoods. I was there as a child and I had a vague recollection of it. The best time to visit is late May through early June. Since it was August I knew I wouldn't be seeing any blooms, but there would be plenty of fog and a beautiful coastline.

I stayed in Klamath which is about dead center of the 40 plus miles of the various redwood parks. The State and National Parks have combined and now act as one big park. The 101 Freeway runs right though the park, but there's the old highway and many dirt roads off the beaten path.

False Klamath CoveOn the first night I went to False Klamath Cove. The fog rolled in and I only had about 10 minutes of color. I got a few good shots but I would not see another sunset. The fog came in every afternoon starting around 4.

California Redwoods - Coast Highway FogThe fog was so thick it made it tough to shoot along the coast. At times I wasn't able to see past the pullout. But fog and redwoods are a perfect mix. An early morning hike into the foggy woods is a surreal experience. The fog gets so thick it seems like you're walking though a painting. I went along the Coast Drive. It's a dirt highway off the 101 beginning at the south corner of Del Norte Coast Redwoods State Park. It hugs the cliffs along the coastline. You can see some of my photos here on a previous post. All fog no coast.

Paul Bunyan - Trees of Mystery
Sky Trail - Trees of MysteryI headed back to Klamath around 11 and stopped in at the "Trees of Mystery". It's a tourist trap to be sure. Years ago as you traveled up the coast you couldn't miss all the cardboard bumper stickers tied to each and every car. They were yellow with "Trees of Mystery" in bold red type. The park has made improvements but it's trademark 49 foot tall Paul Bunyan statue with a 35 foot Babe the Blue Ox along his side remains out front. Loud music is playing and Paul Bunyan shouts over the P.A. to the all little kids. They look up at in amazement at Big Paul as if he was really talking. My favorite part (as if that wasn't enough) was the Sky Trail a tram ride up the mountain. On a clear day you can see the ocean from here. It was still foggy so I couldn't see the ocean but there are plenty of other views right from the platform. You can hike the trail that winds around the top too.

Trees of Mystery
ElkLast but not least there are several herds of Elk in the park. They're usually right off the 101 on Davidson Road. There are many pull outs to shoot from. I found that for days 3 bucks stayed in front of someones farmhouse. You better not get close. They're wild and (at when I visited Canada) they have been known to run down joggers.

California Redwoods
With it's rocky coastline, towering trees and plentiful wildlife you'll have a wide variety to shot. It's also one of the easiest parks to photograph as long as you play along with the weather. A rule of thumb is to shoot the redwoods in the mornings and check out the coast at sunset. Of course a foggy coast can look great if the fog isn't too thick. I hope to return one spring when the rhododendrons are in full bloom. They would add a little extra sparkle.

For more photos see my Redwood National Park Gallery.
For an excellent photo guide on California's Redwoods see Photograph America
Don Gale Workshops is planning a trip to the California's Redwoods in late spring 2008

Labels: ,

Sunday, September 16, 2007

A Recipe for Fine Art


There are those photos that just stick in your mind forever. I had the pleasure of making 2 instructional videos for photographer Don Gale. I was the Director and the Video Editor. On the 2nd video we traveled up California's Central Coast and Don took some truly great photos. Looking back it's an amazing feat since I made him jump through so many hoops while taping and it rained most of the way up.

One of our stops was La Purisima Mission. Inside one the rooms Don found the perfect light and took some still life shots. One was of a gourd in a bowl. It always stuck with me, so this year I decided to stop off there on my way to Big Sur. The light wasn't the same but I took the shot anyway. I came up with my own shots and walked away pleased. Still, I wished I had that shot. Not as a trophy shot. I wanted to solve the puzzle of seeing ultra soft light and then working with it in an artistic manner.

Fast forward to last week when I got a copy of "The Art of Photoshop for Digital Photographers" by Daniel Giordan. In it were photos that reminded me of some of Don's shots. I took one of my photos and gave it a crack. In a few minutes I came up with a pretty good photo and very good lesson in Photoshop.

Here's the basic recipe: Crop one mediocre photo. (At least in my case.) Add a curves adjustment layer to darken it. Add another photo that has lots of texture and set the blend mode to overlay. Paint the layer masks with a soft brush to bring out the qualities of each layer. Add type to taste.

The trick is to use a steep curve to really darken the first photo and then paint back in the parts you want to stand out using the layer mask. (i.e. The gourd and bowl.) Then add the texture (i.e. part of the door photo enlarged to fit - I just wanted the paint chips). Use the overlay blend mode so just enough of the texture shows through. The blend modes are on the top left of the layers palette. On this layer paint out the parts that you don't want. (Again using a layer mask with a soft brush at 35% opacity.) Add type if you want. Here I used Cits and Trajan. I picked colors from the photo to fill the type. I also used the warm mist plug in from 55mm to soften the photo a bit and give it a glow. Most photo editing programs offer similar features.

Well the mock book cover is not as good as Don's original shot, but somewhere sometime I'm going to see that light and I'll be ready. Until then I'm happy to pick up a few more Photoshop skills. I'll be shooting more textures to be sure. This technique of combining textures would make a great backdrop for book pages. I can't wait to try more examples from the book. I like the fact that you can download the book samples and follow along.

Don used very soft light and here I've created an image with much more contrast, but either way, the end result has a fine art quality. I like my new book I believe it will expand my vision. I think more trips with Don are in store too.

On Amazon you'll find: Don Gale's DVD - Photographing San Francisco and California's Central Coast and The Art of Photoshop for Digital Photographers.

Travel with Don Gale on one of his workshops.
For more La Purisima Photos see my gallery or visit Don Gale's Gallery

Labels:

Thursday, September 13, 2007

Photographing the Columbia River Gorge

Columbia River Gorge
The last 2 summers I stopped off in Portland on my way to photograph Mt. Rainier. I'm always trying to cram in more than I should and the Columbia River Gorge is truly worth a trip all on it's own. I was only able to stay overnight each time. I like to stay in Troutdale which is just outside Portland and very close to the Gorge. The main freeway along the Gorge is the 84 but it's better to get off at Corbet Hill Road (Exit 22) and follow the signs towards Crown Point. (You''ll be turning onto Crown Point Road.) The road changes names and eventually becomes Historic Columbia River Highway. All of the main waterfalls are along this old highway. It's 2 lanes and very narrow in spots. You'll drive under canopies of trees and cross over some old moss covered bridges.

Crown Point
Portland Womens ForumI like to make my first stop Chanticleer Point which is cared for by the Portland Women's Forum. It's a small parking lot that has a view of Crown Point. It's a great location at Sunset. Sunrise isn't bad here, but so far the early morning fog has pushed me to Crown Point itself.

It's a short drive to Crown Point and it too offers many spectacular views of the Columbia River Gorge. There's more of a crowd here at Sunset, but almost no one at Sunrise. With a long lens you can pick out the sweet spots. (See Last Shot.)

Multnomah FallsMoving down the road you'll find many waterfalls, but the granddaddy of them all is Multnomah Falls. If you're coming from town take the main exit (for Multnomah Falls) off the 84 freeway you'll end up in the lower parking lot. If you take the Old Highway from Crown Point you'll be in the upper parking lot right next to the falls. There's a large Restaurant and Gift Shop and if you arrive late in the day you'll find bus loads of people. I recommend going very early, right after Sunrise, while the falls are in shade. After you get your main shots of the falls continue up the hill. Here you can get a few shots of the upper falls as well and you can cross over the bridge.


Columbia River Gorge
It's been sunny both of the times I was there, but if it's overcast I think I'd hike in to one of the other falls there. On sunny days with the extreme contrast of bright daylight and deep shade it's best to just enjoy the hike. You'll have the place all to yourself. I've never see anyone else on the trails. I hear Panther Falls, which is on the Washington side, is one of the best locations. There's a host of other falls listed in Robert Hitchman's Photograph America's Photo Guide. These are great guides and a true bargain. Please don't follow my poor example. Take your time and gorge yourself. (Did I say that?)

For More Photos see my Oregon Gallery.
For info on Mt. Rainier see my previous post Photographing Mt. Rainier.

Labels: ,

Wednesday, September 12, 2007

Black and White Conversions

Monument Valley
Here's a quick tip on convert color images to black and white. It's straight from the Adobe Website and it's free. No high dollar plug ins.


First open your color image and create an adjustment layer. It's the little circle at the bottom of the layer's palette. Select "Hue/Saturation" and pull the saturation slider to zero. (Click on these examples to read.)


Hit enter and select color as the blend mode. (The blend mode is near the top of the layers palette just under the word "Layers".)


Now select the bottom layer and put another adjustment between your photo and the first adjustment layer. Now adjust the hue slider, which acts as a filter, to taste. You can add another curves or levels adjustment layer on the very top if needed. Flatten and save. You can make this into an action and double click on the adjustment layers to change them. You can also add a photo filter to add a tint. This of course is just one of the many ways PhotoShop offers, but it's the one I use most often.


If you do a lot of black and white work you should think about upgrading to CS3 which has a killer adjustment for converting color to black and white. You also have the same amount of play in Lightroom, but for those of you who don't have the cash (or like in the bank where it belongs) this old trick works in PhotoShop and most photo editing programs.

Labels:

Tuesday, September 04, 2007

The Last Days of Summer

Leo Carrillo State Beach, Malibu, CA - Sunset
A summer storm swept over So Cal in these last days of summer. It was a hold over from Hurricane Dean. Not much in the way of rain, but lots of clouds and humidity that only a summer storm can bring. I thought the clouds were thin enough for the sun to poke through so I headed to Malibu. I went to Leo Carrillo State Beach knowing that I would be able to see the setting sun there this time of year. El Matador Beach has cliffs that might block my view. In the winter the sun sets farther south and you can pretty much go to anyone of these coves, but in the summer you have to pick your spots.

Leo Carrillo State Beach, Malibu, CAA warm wind was blowing and the beach wasn't the way I remembered it. All the rocks that were prominent in my earlier photographs were covered with sand. I talked to surfer Kevin Ryan and he said that this is a typical pattern for this beach. The smaller summer waves push the sand up onto the beach and the bigger winter waves crash in to the rocks and pull the sand in back into the ocean. Looking for some foreground I was forced to perch myself on a small ledge on the side of a cliff.


One of the tricks to getting a good seascape is to catch the glint on the water. When the water moves out it leaves a thin layer of water on the sand and a beautiful reflection results. I like to frame up the picture and use a cable release. Then I don't have to look through the viewfinder anymore. I just look out at the ocean and when I see a good reflection I fire away. Often I use f/22 in order to get a longer exposure and gives a blur the water. When the suns in the frame I may chose f/8. At f/8 the sun is more of a soft edged glow and at f/22 it becomes a sharp edged circle.

Leo Carrillo State Beach, Malibu, CA
I'm not sure how good the pictures are but the experience was unbeatable. The waves should come in from the west, but once in while they would get enough power to go up the hill and come straight back at me filling the small cove (North to South). The waves would even climb the ledge I was standing on and trickle down. After the sun went down I walked along the beach. I turned back and took a shot of the moonrise. I used a 30 second exposure in order to get that cotton candy look on top of the waves. With the warm wind, beautiful light and majestic ocean, I truly enjoyed the last days of summer. The photos are just a bonus.

Leo Carrillo State Beach, Malibu, CA - Moonrise
For more on Malibu see Photographing Malibu
Some of the tips I got are from Tony Sweet's books
You can visit his site or buy his books on Amazon
For Photo Workshops see Don Gale's site

Labels: ,